Cisco Nexus Switch SSH login with YubiKey using X.509 certificate - Part II (two-factor and remote AAA TACACS+)
This is the continuation of Part - I, where we have configured X.509 certificate based SSH login with a Cisco Nexus switch. In this part we will do the same configuration; but AAA will be implemented in Cisco ISE with TACACS+ protocol. But we have the same limitations on the client side - we must use SecureCRT or Pragma Fortress SSH Client.
In this blog the main difference will be two things. Firstly - we will not define any local user in the switch for whom we have the certificate in the YubiKey. Secondly - we will configure TACACS+ in the switch and configure Cisco ISE as TACACS+ server to do AAA remotely. One important difference here with normal AAA with TACACS+ is that - with X.509 based SSH - Authentication will be done still locally in the switch by verifying the user's CA certificate (no need of local account creation in the switch). Authorization and Accounting will be done in the TACACS+ server. Also X.509 SSH login is not supported with Radius protocol and the NXOS version must be 10.4.3 or higher.
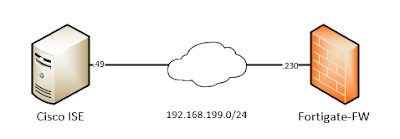
We will use below topology -
 |
| 01 - Network Topology |
We have already configured a YubiKey with user certificate/key (user's public/private key). Certificate related configuration like - configuring CA, issuing user certificates from the CA and transferring the user's certificates to YubiKey; will not be covered in this blog. One can easily find those by using simple Google search.
Note: We do not need to install the CA certificate in the YubiKey or in the SSH client's operating system. The CA certificate (public key) needs to be installed in the Switch only.
Let's check our user certificate from Windows -
# certutil -user -store My
My "Personal"
================ Certificate 2 ================
Serial Number: Removed
!!! CA (Issuer) DN.
Issuer: CN=red-ca, O=Removed, S=Removed, C=Removed
NotBefore: Removed
NotAfter: Removed
!!! User DN.
Subject: O=RedCompany, CN=redremote, C=SE
Non-root Certificate
Cert Hash(sha1): Removed
!!! Provider is smart card which means YubiKey.
Provider = Microsoft Smart Card Key Storage Provider
Private key is NOT exportable
Now we have verified we have a user certificate installed in YubiKey which has CN=redremote and issued by a CA named - red-ca.
This time we will configure the Cisco ISE first.
Create a user - "redremote" in Cisco ISE and add the user to group called - "Group_Nxos_Rw". If we have joined the ISE with Windows Active Directory - then in AD we will create the user. Most important here is the username will be exactly the same as user's certificate CN. Initially we will configure password for the user to test TACACS+ configuration. When all the implementation/testing is completed successfully, we can disable the password for the user.
 |
| 02 - User Creation ISE |
 |
| 03 - Group Creation ISE |
Now we will configure Allowed Protocols, TACACS Command Sets and TACACS Profiles in ISE.
 |
| 04 - Allowed Protocols |
 |
| 05 - TACACS Command Sets |
 |
| 06 - TACACS Profiles |
In TACACS profiles we are required to define two AV-Pairs which are shell:roles and cert-application.
Now create the actual TACACS policy that binds everything together and with that our Cisco ISE configuration is completed.
 |
| 07 - TACACS Policy 01 |
 |
| 08 - TACACS Policy 02 |
 |
| 09 - TACACS Policy 03 |
Let's start configuring the Nexus switch -
!!! IP connectivity and NTP configuration.
interface Ethernet1/1
no switchport
ip address 172.29.215.98/24
no shutdown
ip route 0.0.0.0/0 172.29.215.1
clock timezone CET 1 0
clock summer-time CEST 2 Sun Mar 02:00 1 Sun Nov 02:00 60
!!! NTP is required to check certificates validation date etc.
ntp server X.X.X.X use-vrf default
Upload the CA certificate (public key) to the switch.
!!! CA trustpoint creation to upload the CA certificate.
crypto ca trustpoint red-ca type x509
!!! As this is a lab, CRL checking is disabled intentionally.
revocation-check none
!!! CA certificate will be added by copy/paste into the terminal directly.
enrollment terminal
!!! Copy/Paste the CA certificate.
!!! If you have root, intermediate CAs copy/paste all the CA certificates together.
!!! We do not need several trustpoint for CA-hierarchy.
!!! The format for certificate used is PEM.
crypto ca authenticate red-ca
!!! Verify the CA certificate.
# show crypto ca certificates
Trustpoint: red-ca
CA certificate 0:
subject=C = Removed, ST = Removed, O = Removed, CN = red-ca
issuer=C = Removed, ST = Removed, O = Removed, CN = red-ca
serial=Removed
notBefore=Removed
notAfter=Removed
SHA1 Fingerprint=Removed
purposes: Removed
We will enable tacacs and configure it.
feature tacacs+
tacacs-server directed-request
tacacs-server host 172.29.215.41 key <Removed> timeout 5 single-connection
aaa group server tacacs+ Tac_Grp
server 172.29.215.41
use-vrf default
Before configuring AAA, we will test our tacacs settings -
# test aaa group Tac_Grp redremote <user-password>
!!! User has successfully authenticated
user has been authenticated
From now on we need to be extra careful, because NXOS's AAA does not allow local fallback if we configure AAA commands incorrectly. We will configure authentication and accounting first. Command authorization will be configured last.
aaa authentication login default fallback error local
aaa authentication login error-enable
aaa authentication login invalid-username-log
aaa authentication login default group Tac_Grp
aaa accounting default group Tac_Grp
Before configuring anything else we will try to login to the switch using the username/password first. Only if the username/password login is successful with Cisco ISE and TACACS+, then we will proceed to the next steps.
Now we will configure the X.509 based settings that is required for TACACS+. Remember Authentication will be done locally in the switch using the CA certificate verification. Only the Authorization and Accounting will be done using Cisco ISE or TACACS+ server.
Let's implement the relevant settings for TACACS+ with X.509 certificates in the switch -
!!! Enable aaa authorization for certificate based login.
aaa authorization ssh-certificate default group Tac_Grp
!!! We need inform ISE what is the username.
!!! ISE will do group membership lookup using the username.
!!! ISE will not do any password verification.
!!! We will apply a filter-map to extract the username from certificate's DN.
!!! Our filter is CN=username
crypto certificatemap mapname Cert_Cn_Filter
filter subject-name CN=%username%
crypto cert ssh-authorize default map Cert_Cn_Filter
Optionally adjust the logging so that we get all the relevant logs from the switch.
logging console 7
logging logfile messages 7
!!! Configuration mode commands will be logged in the switch's local logfile.
logging level aaa 6
After above we can test from SecureCRT, if we can login using certificate stored in YubiKey.
 | ||
10 - SecureCRT SSH session settings
After successful verification of SSH login (authentication); now we will implement command authorization in the switch. !!! All execution mode commands need authorization. aaa authorization commands default group Tac_Grp local !!! All configuration mode commands need authorization. aaa authorization config-commands default group Tac_Grp local |

Let's verify the AAA from ISE's TACACS live logs. We will not see any log for Authentication (done locally in the switch). We will see Authorization logs only.
 |
| 12 - TACACS Authorization Log 01 |
 |
| 13 - TACACS Authorization Log 02 |
We have done all the configuration steps and verified them also. Let's wrap up our blog for today.

Comments
Post a Comment