Fortigate firewall AAA Configuration for management with TACACS+ protocol and Cisco ISE
In this blog I will write about how to implement AAA services in Fortigate firewalls using Cisco ISE as an authentication server with TACACS+ protocol.
First good to know our limitations. AAA means - Authentication (supported by ISE TACACS+), Authorization (partially supported by ISE TACACS+; Fortigate implements Admin-Profiles; so what a user can/cannot do is defined locally in the firewall with "Admin Profiles"; ISE just instructs the firewall to allocate one of those profiles), Accounting (not supported; instead configure syslog to get accounting data, Fortigate firewalls generate syslog messages for configuration changes made by a user).
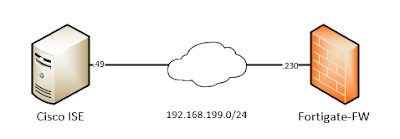
Let's jump to our configuration. Our topology is very simple; one Fortigate firewall and Cisco ISE server connected with the same management network which looks like below -
01 - Network Topology
We have a management network 192.168.199.0/24. The firewall is at .230 and Cisco ISE is at .49 IP address. We are running the latest version of ISE - version 3.0.
And our AAA requirements; we will have two types of administrative users - RW users (allowed to do all kinds of change in the firewall), RO users (allowed to do only view operations in the firewall; cannot make any kind of change).
Fortigate Firewall Configuration
We first define our TACACS+ server in the firewall. By default; TACACS+ settings are not shown in FortiOS web-gui. We need to configure it from CLI. After configuration from the CLI; the settings are shown in web-gui.
We have configured the following from the CLI -
config user tacacs+
edit "TACACS-Server-Cisco-ISE"
!!! Server IP Address
set server "192.168.199.49"
!!! Tacacs secret key
set key test123
!!! PAP will be used
set authen-type pap
set authorization enable
next
end
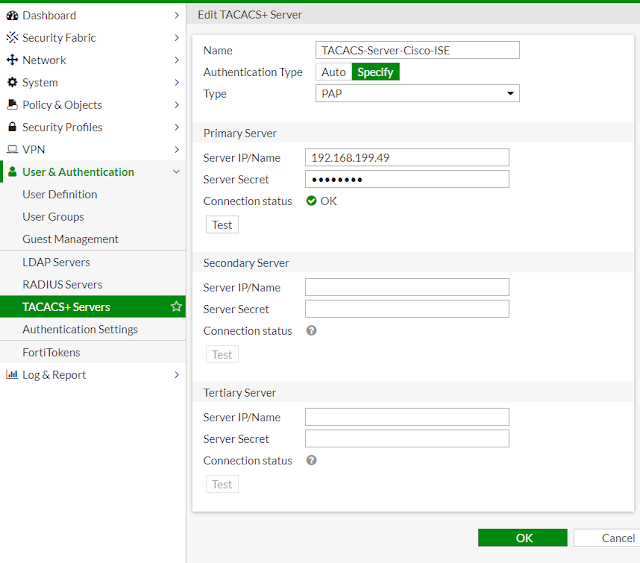
After that TACACS options are available in web-gui.
02 - Fortigate Tacacs Configuration
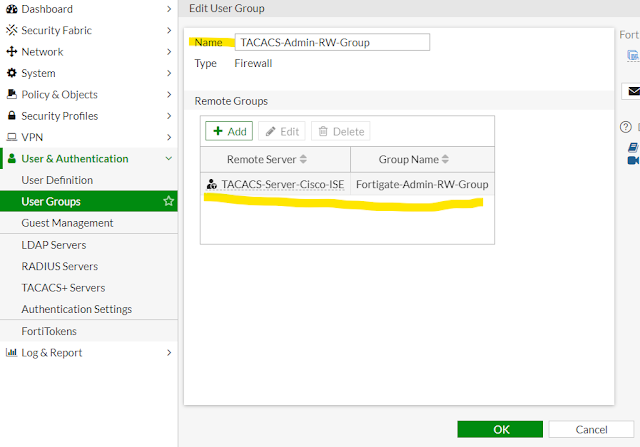
Now we need two user groups configured in the firewall (Read-Only and Read-Write).
03 - User Group (Read-Write)
04 - User Group (Read-Only)
Their equivalent CLI configuration is given below -
config user group
edit "TACACS-Admin-RW-Group"
set member "TACACS-Server-Cisco-ISE"
config match
edit 1
!!! Referencing the created Tacacs Server
set server-name "TACACS-Server-Cisco-ISE"
!!! Setting an arbitrary group name
set group-name "Fortigate-Admin-RW-Group"
next
end
next
edit "TACACS-User-RO-Group"
set member "TACACS-Server-Cisco-ISE"
config match
edit 1
set server-name "TACACS-Server-Cisco-ISE"
set group-name "Fortigate-User-RO-Group"
next
end
next
end
In above the most important setting is - set group-name "Fortigate-User-RO-Group"; this is an arbitrary group name given for read-only users. This name must match in both Fortigate firewall and Cisco ISE configuration. This name has no relation to Local user groups defined in Cisco ISE, LADP/Active Directory user groups for authentication; it is just a name of group that needs of match between the firewall and the AAA server to allow read-only access. Same is true for read-write access.
Now we will configure three "Admin Profiles" in the firewall - No-Access (No permission), Admin-RW-Profile (All permissions), User-RO-Profile (Read-only permission). I will just show one profile configuration; as it is pretty self explanatory -
The cli configuration for all the "Admin Profiles" is given below -
config system accprofile
!!! No access is given with this profile
edit "No-Access"
set system-diagnostics disable
next
!!! Read-Write access is given with this profile
edit "Admin-RW-Profile"
set secfabgrp read-write
set ftviewgrp read-write
set authgrp read-write
set sysgrp read-write
set netgrp read-write
set loggrp read-write
set fwgrp read-write
set vpngrp read-write
set utmgrp read-write
set wanoptgrp read-write
set wifi read-write
next
!!! Read-Only access is given with this profile
edit "User-RO-Profile"
set secfabgrp read
set ftviewgrp read
set authgrp read
set sysgrp read
set netgrp read
set loggrp read
set fwgrp read
set vpngrp read
set utmgrp read
set wanoptgrp read
set wifi read
!!! User not allowed to run debug/diagnose commands
set system-diagnostics disable
next
end
Now we will create "Administrators" accounts which in turn will be assigned one of those "Admin Profiles" after successful authentication. We will create two "Administrators" - one for read-write and another for read-only.
Both accounts CLI configuration is shown below -
config system admin
!!! Read-Write Admin
edit "Tacacs-Admin-RW"
set remote-auth enable
!!! Setting profile as NO-Access; but will be overridden by TACACS server after successful authorization
set accprofile "No-Access"
!!! Which vdom the user is grated access. vdom is out of scope for this blog.
set vdom "root"
set wildcard enable
!!! Relating the account with proper TACACS group
set remote-group "TACACS-Admin-RW-Group"
!!! Admin Profiles will be overridden by TACACS server
set accprofile-override enable
next
!!! Read-Only Admin
edit "Tacacs-User-RO"
set remote-auth enable
set accprofile "No-Access"
set vdom "root"
set wildcard enable
set remote-group "TACACS-User-RO-Group"
set accprofile-override enable
next
end
Here the most confusing setting; which works as a combination - set accprofile "No-Access" and set accprofile-override enable. What the two settings do is - initially every user is assigned "No-Access" profile. But after successful authentication, Cisco ISE TACACS will override that profile and tell the firewall to authorize a proper profile according to a user's access level. How this override works - TACACS server will send a "Admin Profile" name and the firewall will match that profile's name to one of it's locally defined profiles and assigned it to the user by overriding the "No-Access" profile.
That's it we are done with our firewall configuration.
Cisco ISE Configuration
Let's add our firewall (192.168.199.230/24) as a network device in Cisco ISE.
07 - Add a network device ISE
I will not show how to create "Device Profile" or "Device Type" in the above screenshot. Those things are covered in detailed in my other blogs about Cisco ISE. Have a look at those!
Now we will create two "TACACS Profiles" -
Fortigate_Admin_Profile with following attribute -
|
Name |
Value |
Comment |
|
service |
fortigate |
|
|
admin_prof |
Admin-RW-Profile |
Must match
with the profile defined in Fig - 05 |
|
memberof |
Fortigate-Admin-RW-Group |
Must match
with the group name defined in Fig -03 |
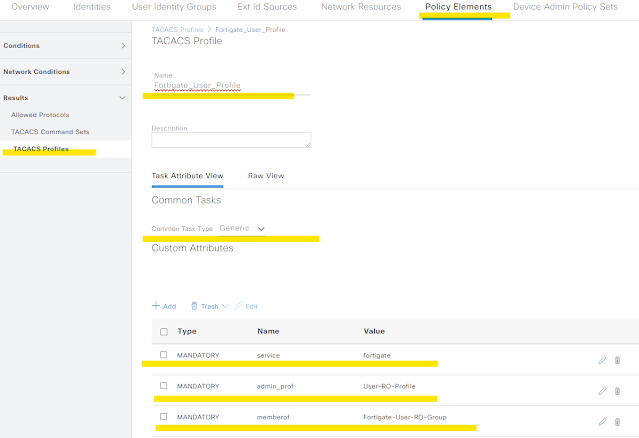
Fortigate_User_Profile with following attribute -
Name | Value | Comment |
service | fortigate | |
admin_prof | User-RO-Profile | Must match with the profile defined in Fig - 05 |
memberof | Fortigate-User-RO-Group | Must match with the group name defined in Fig -03 |
The profiles looks like below in ISE -
08 - Admin Tacacs Profile ISE
09 - User Tacacs Profile ISE
Now comes the last step - we will bind everything with a policy set -
10 - Policy Set ISE
From above we can see that - this policy set will be picked up by ISE when a "device-type" is "Fortigate-Firewalls". We will authorize "Fortigate-Admin-Profile" if the user belongs to ISE's internal user group named "Device-Tac-Admin-Group". Or we will authorize "Fortigate-User-Profile" if the user belongs to ISE's internal user group named "Device-Tac-User-Group". For creating local users/groups in ISE, please have a look at my other blogs!
Verification
Now we will verify everything works by using two usernames - tacnetadm (RW access) and tacnetopt (RO access).
Let's test the connection to our TACACS server from CLI -
# diagnose test authserver tacacs+ <server_name> <username> <user-password>
# diagnose test authserver tacacs+ TACACS-Server-Cisco-ISE tacnetadm mypass
authenticate user 'tacnetadm' on server 'TACACS-Server-Cisco-ISE' succeeded
Admin profile: Admin-RW-Profile
Group membership(s) - Fortigate-Admin-RW-Group
We can see from above output that user named tacnetadm has authenticated successfully and authorized with Group - Fortigate-Admin-RW-Group and Profile - Admin-RW-Profile.
This verifies that our TACACS configuration in both ISE and firewall working properly.
Let's try to login to the firewall with a ssh session with username - tacnetopt and after login we run the following command -
# get system admin list
username local device vdom profile
admin console N/A root super_admin
tacnetopt ssh port1:192.168.199.230:22 root User-RO-Profile
We can see that the user has been logged in via SSH and granted "User-RO-Profile".
If we want to debug tacacs; then we can run following commands and observe in the firewall console what happens when a user tries to login (debug ) -
# diagnose debug application fnbamd -1
# diagnose debug enable
[1032] __tac_plus_try_next_server-Try TACACS-Server-Cisco-ISE:192.168.199.49
[359] __tac_plus_dns_cb-Resolved TACACS-Server-Cisco-ISE:192.168.199.49 to 192.168.199.49, cur stack size:1
[762] tac_plus_result-Authen sending request
[772] tac_plus_result-Authen receiving reply
[556] parse_authen_reply-authen result=1(pass)
[577] build_author_req-building author req packet: authen_type=2(pap)
[705] parse_author_reply-Authorization arg0: memberof=Fortigate-User-RO-Group
[705] parse_author_reply-Authorization arg1: admin_prof=User-RO-Profile
[705] parse_author_reply-Authorization arg2: service=fortigate
[709] parse_author_reply-Authorization result=2
[788] auth_tac_plus_result-Passed group matching
[1041] tac_plus_destroy-TACACS-Server-Cisco-ISE
From above debug massages; we can see that we are matching the proper group and profiles.
And all for how to configure a Fortigate firewall and Cisco ISE for AAA with TACACS+ protocol.


awesome, will this be config same if we are using fortiauthenticator?
ReplyDeleteFortigate firewall config will be more or less same. But you need to change you configurations for AAA server. I do not know how tacacs is implemented in fortiauthenticator. Better to use radius in such cases. Because fortigate firewall do not support individual command authorization, which is the most usuful thing with tacacs.
ReplyDeleteWonderful - very elaborative and clearly defined.
ReplyDeleteI however could not make it work on "PAP" but on "CHAP"
Can I still login with the local admin account when creating the TACACS server? Or will I be locked out?
ReplyDeleteFortigate firewalls always tries all authentication methods (local, radius, tacacs). It is not like Cisco when tacacs server available it will not try lical accounts. So, with Fortigate no risk of lockout as long as you type the correct locally defined username/password.
ReplyDeleteIs there any document for specific vdom access to users.
ReplyDeleteFrom the blog -
ReplyDeleteedit "Tacacs-User-RO"
set vdom "root"
end
In above you set vdom. And don't forget in vdom fortigate; you do administrative user management from global view.
Very good, this tutorial saved me. Is there something like that for authenticating Ubuntu and Red Hat systems?
ReplyDeleteI managed to implement fortigate in fortiauthenticator with this configuration, I just changed the authentication type to ASCII, which is recommended by the manufacturer for this communication.
ReplyDeleteExcellent Document. Very Helpfull
ReplyDeleteHow you add fortinet profile on device vendor for cisco ise
ReplyDeleteThere is no concept of vendor dictionary in tacacs. Kindly check the screenshots of the ise in the blog. That is how you set fortinet specific attributes for tacacs.
Delete