High Availability (HA) Cluster Configuration With Fortigate Firewalls (Active-Passive)
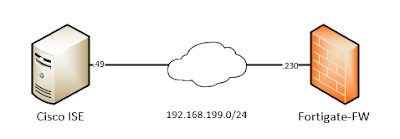
In this blog we will look at how to setup HA-Cluster in Active-Passive mode with two fortigate firewalls. As usual let's introduce our topology -

01 - HA Network Topology
Let's have a brief idea about terminology -
HA-Heartbeat Interface - With these interfaces fortigate firewalls talk with each other using FGCP (Fortigate Clustering Protocol) and does all of it's cluster management tasks. For example - configuration synchronization, session pickup etc. In our setup we have reserved two interfaces - port7 and port6 for this purpose. Only one heartbeat interface is active at a time. Other heartbeat interface is used as standby. And heartbeat interfaces does not need any explicit IP address assignment; FGCP does take care of this.
Master/Slave firewall - The firewall that is responsible for forwarding traffic is called Master. And the other firewall that is standby which will take over when the Master fails is called Salve. That's why we are calling our setup Active-Passive.
OOB-Mgmt Interfaces - Fortigate cluster setup has one major difference with other vendors HA implementation. When a cluster is formed; one single IP adress is shared by the cluster members. There is no concept of virtual IP that we used to in setup like VRRP/HSRP. To overcome this and manage our cluster members separately; we will use an interface reserved for management so that we can reach both members of the cluster individually.
Internet/LAN IP address - As mentioned above when a two-node cluster is operational; for internal/external connectivity we will use one single IP adress. This single IP adress is assigned to the Master unit only. For our case; Internet - 192.168.199.91/24 and Lan - 10.1.1.1/24. When the master unit fails; those IP adress are reassigned to the Slave unit and it assumes the role of Master. There is no concept of one IP adress to each unit and one IP adress as Virtual IP from the same subnet (3 IP addresses) - common scenario when we run protocols like VRRP/HSRP. Fortigate with FGCP protocol we only need one interface IP adress which is assigned to the unit that is Master/Active in the cluster.
Physical Connectivity Setup
One thing to remember when connecting a fortigate cluster members physically to the network (network cabling etc.) is that we will prepare/configure our switches with vlans or other required things first for both the cluster nodes. Then the important thing - we will connect only the Master/Active fortigate node to the network. After that we will configure everything in that firewall; like - interface configuration, firewall policies, SNMP etc. Only after that we will connect our Slave/Passive unit. And in Passive unit we will configure only OOB management interface and cluster parameters (like heartbeat interface, cluster priority etc.). After that members of the cluster unit will find each other and Slave/Passive unit will synchronize it's configuration from the Master/Active unit (other interface IPs, firewall policies etc.). But these configuration will be deactivated in the Slave unit until Master unit fails. As soon as current Master unit fails; the Slave unit will take the responsibility of the Master and activates those disabled configuration.
Master/Active firewall configuration
We have configured our switches for both Active/Passive firewalls and only connected Master firewall physically to the network. Now we will start configuring it by using OOB-Mgmt interface.
Lets configure the "mgmt" port of the firewall so that we can reach it over the network.
FGT-HA-Master (mgmt) # show
config system interface
edit "mgmt"
!!! Assign ip address to the interface
set ip 172.29.165.81 255.255.255.0
!!! Enable management access
set allowaccess ping https ssh fgfm
set type physical
set dedicated-to management
set snmp-index 1
next
end
Now we can reach our firewall using https://172.29.165.81 form a web browser.
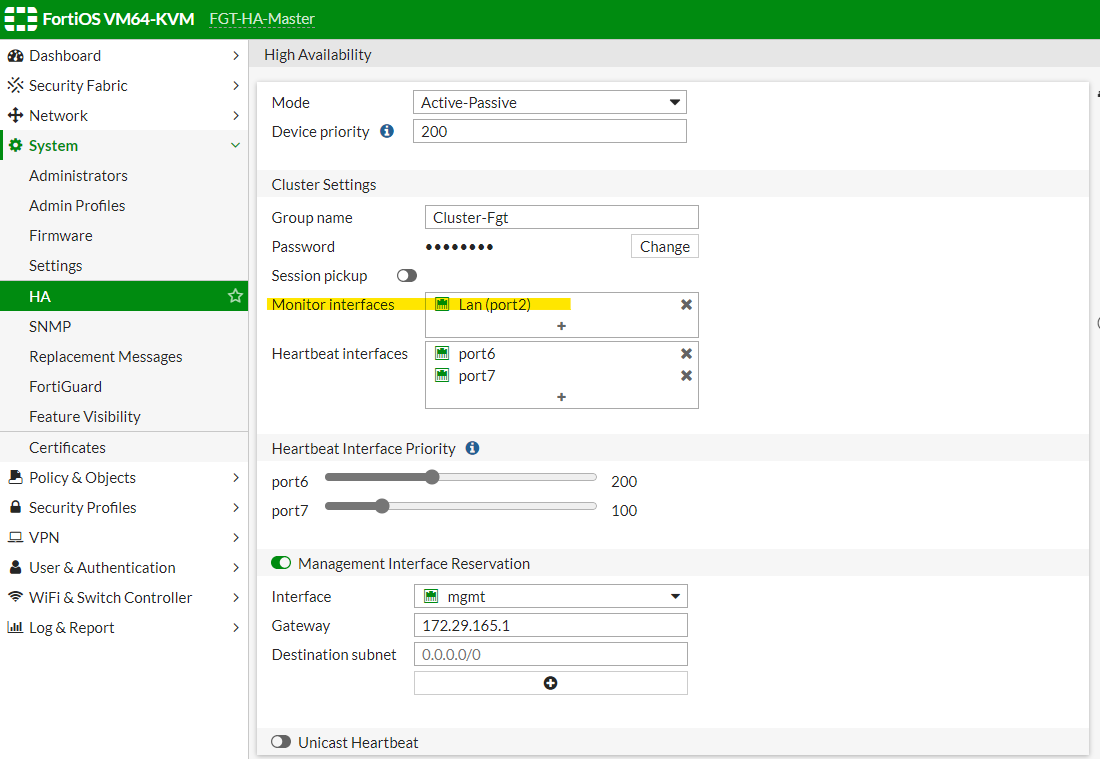
After logging into the firewall from web-gui; we have configured the following for the HA-Cluster -

02 - Master HA Configuration
The options selected above is straight forward. We have selected Active-Passive, device priority 200 (higher priority device becomes Active). We need to define a cluster group name and password - in our case name/password - Cluster-Fgt/test123. Then we have selected port6 and port7 as our heartbeat interfaces and assigned port6 with higher priority so that only that interface is used for FGCP during normal operation and port7 will act as standby heartbeat interfaces. We want to manage/reach our cluster unit individually so interface mgmt that is connected to the OOB-Mgmt network is reserved for Management.
One important thing we cannot do from web-gui is that assign our cluster a group-id. This is a thing we must configure to avoid mac-adress conflict. For example; if someone else connected with our same ISP tries to run a fortigate cluster; then there is a huge risk both our cluster and other person's cluster will use same virtual MAC addresses and a potential for MAC address conflict. So to be on the safe side; it is good to always configure a group-id when configuring a fortigate cluster. Let's look at our cluster setup from CLI with group-id command added -
FGT-HA-Master (ha) # show


config system ha
set group-id 251
set group-name "Cluster-Fgt"
set mode a-p
set password ENC JIWhU7dD+oHOU08gfRDEGdr0tw3fIE
set hbdev "port6" 200 "port7" 100
set ha-mgmt-status enable
config ha-mgmt-interfaces
edit 1
set interface "mgmt"
set gateway 172.29.165.1
next
end
set override disable
set priority 200
end
That's it we are done configuring the Master unit.
Slave/Passive firewall configuration
Now we will connect the Slave firewall to the network. We will only configure mgmt interface and cluster parameters; nothing else.
FGT-HA-Slave (mgmt) # show
config system interface
edit "mgmt"
set ip 172.29.165.82 255.255.255.0
set allowaccess ping https ssh fgfm
set type physical
set dedicated-to management
set snmp-index 1
next
end

03 - Slave HA Configuration
All the settings for cluster is the same for slave; just we are assigning it low priority (100) so that it becomes passive node in our cluster.
FGT-HA-Slave (ha) # show
config system ha
set group-id 251
set group-name "Cluster-Fgt"
set mode a-p
set password ENC kYemyzXqFZzHMc3VrG6jM7xnvqnCBU
set hbdev "port6" 200 "port7" 100
set ha-mgmt-status enable
config ha-mgmt-interfaces
edit 1
set interface "mgmt"
next
end
set override disable
set priority 100
end
HA Synchronization
After the above setup in both nodes; the nodes will find each other by talking with FGCP protocol over heartbeat interface. Then Slave node will try to synchronize it's configuration from the Master node. This behavior can be observed from the CLI console of the Slave node -
FGT-HA-Slave # secondary's external files are not in sync with the primary's, sequence:0. (type CERT_LOCAL)
secondary's external files are not in sync with the primary's, sequence:1. (type CERT_LOCAL)
secondary's external files are not in sync with the primary's, sequence:2. (type CERT_LOCAL)
secondary succeeded to sync external files with primary
secondary's configuration is not in sync with the primary's, sequence:0
secondary's configuration is not in sync with the primary's, sequence:1
secondary's configuration is not in sync with the primary's, sequence:2
secondary starts to sync with primary
logout all admin users
It will take some time before the nodes sync their configuration with each other. When the nodes are in sync we can see that from both web-gui and CLI.

04 - HA Synchronization Status
From CLI -
FGT-HA-Master # get system ha status
HA Health Status: OK
Model: FortiOS-VM64-KVM
Mode: HA A-P
Group: 251
Debug: 0
Cluster Uptime: 4 days 0:18:10
Cluster state change time: 2021-02-16 01:34:53
ses_pickup: disable
override: disable
Configuration Status:
FOSVM1KIV5CQ2E48(updated 3 seconds ago): in-sync
FOSVM12EEYRK_Q57(updated 4 seconds ago): in-sync
System Usage stats:
FOSVM1KIV5CQ2E48(updated 3 seconds ago):
sessions=2, average-cpu-user/nice/system/idle=0%/0%/0%/100%, memory=38%
FOSVM12EEYRK_Q57(updated 4 seconds ago):
sessions=0, average-cpu-user/nice/system/idle=0%/0%/0%/100%, memory=35%
Primary : FGT-HA-Master , FOSVM1KIV5CQ2E48, HA cluster index = 0
Secondary : FGT-HA-Slave , FOSVM12EEYRK_Q57, HA cluster index = 1
number of vcluster: 1
vcluster 1: work 169.254.0.1
Primary: FOSVM1KIV5CQ2E48, HA operating index = 0
Secondary: FOSVM12EEYRK_Q57, HA operating index = 1
Configuring Lan/Internet connectivity for network
Now we have our cluster in-sync. We will configure the rest of the network - configure Lan, Internet and firewall policies so that Lan devices get internet connectivity. We will configure those by logging into the Master node over OOB-Mgmt interface. All the changes done in the Master node will be synchronized to the Slave node by using FGCP.
Now I will configure the LAN interface. LAN will also provide DNS and DHCP service to the connected network. I will show the configuration from CLI even though I have configured the settings from the web-gui.
FGT-HA-Master (port2) # show
config system interface
edit "port2"
set vdom "root"
set ip 10.1.1.1 255.255.255.0
set allowaccess ping https ssh
set type physical
set description "Lan"
set alias "Lan"
set device-identification enable
set snmp-index 3
next
end
FGT-HA-Master (2) # show
config system dhcp server
edit 2
set dns-service local
set default-gateway 10.1.1.1
set netmask 255.255.255.0
set interface "port2"
config ip-range
edit 1
set start-ip 10.1.1.101
set end-ip 10.1.1.200
next
end
next
end
FGT-HA-Master (dns-server) # show
config system dns-server
edit "port2"
next
end
Now we will configure internet facing interface and a default route out of that interface.
FGT-HA-Master (port1) # show
config system interface
edit "port1"
set vdom "root"
set ip 192.168.199.91 255.255.255.0
set allowaccess ping
set type physical
set description "Internet"
set alias "Internet"
set snmp-index 2
next
end
FGT-HA-Master (static) # show full
config router static
edit 1
set status enable
set dst 0.0.0.0 0.0.0.0
set gateway 192.168.199.2
set device "port1"
next
end
The only thing is left is to a create a firewall policy which allows Lan to reach Internet. As usual we will use a zone-based policy.
FGT-HA-Master (zone) # show
config system zone
edit "Internet-Zone"
set interface "port1"
next
edit "Lan-Zone"
set interface "port2"
next
end
FGT-HA-Master (policy) # show
config firewall policy
edit 1
set uuid c6b37cda-7049-51eb-6807-117c3a840e60
set srcintf "Lan-Zone"
set dstintf "Internet-Zone"
set srcaddr "all"
set dstaddr "all"
set action accept
set schedule "always"
set service "ALL"
set nat enable
next
end
That's it we are done with our full configuration of the network. These changes made in the Master node will be synchronized to the Slave node automatically.
Cluster Failover/Debugging
Now we will try to do a SSH towards 10.1.1.1/24 from PC-01 (10.1.1.101/24).
root@debian01:~# ssh admin@10.1.1.1
admin@10.1.1.1's password:
FGT-HA-Master #
From the above output we can observe that when we are connecting to the LAN firewall IP address; we are logging into the Master node which is the Active node at this moment. Our claim of using one single IP adress is verified.
Now we will verify cluster failover using a feature called "Monitor Interfaces" - which means that when the active member detects that a monitored interface has gone down; the passive member will take the responsibility of forwarding traffic. In our case; we will monitor our LAN (port2) interface. To enable monitoring - we do the below only in the Master node; Slave will get this change through synchronization. After that if we shutdown the switch interface (Internal-Switch) connected to the Master firewall; we will see a cluster failover. Then the Slave will be the new active node.
05 - HA Monitoring Interfaces
Let's do the same verification by running a SSH towards our firewall from the LAN PC; this time we will be logged into the Slave firewall which is active now because of failed monitor interface.
root@debian01:~# ssh admin@10.1.1.1
admin@10.1.1.1's password:
FGT-HA-Slave #
The output from the firewall -
FGT-HA-Slave # get system ha status
HA Health Status:
WARNING: FOSVM1KIV5CQ2E48 has mondev down;
Model: FortiOS-VM64-KVM
Mode: HA A-P
Group: 251
Debug: 0
Cluster Uptime: 0 days 0:42:20
Cluster state change time: 2021-02-16 04:04:44
Primary selected using:
<2021/02/16 04:04:44> FOSVM12EEYRK_Q57 is selected as the primary because it has the least value 0 of link-failure + pingsvr-failure.
<2021/02/16 03:32:47> FOSVM1KIV5CQ2E48 is selected as the primary because it has the largest value of override priority.
ses_pickup: disable
override: disable
Configuration Status:
FOSVM12EEYRK_Q57(updated 4 seconds ago): in-sync
FOSVM1KIV5CQ2E48(updated 1 seconds ago): in-sync
Primary : FGT-HA-Slave , FOSVM12EEYRK_Q57, HA cluster index = 1
Secondary : FGT-HA-Master , FOSVM1KIV5CQ2E48, HA cluster index = 0
Let's try one last scenario; what happens if we activate the switchport again and the Master node gets its monitor interface back. Will the Master node preempt the Salve node and take the responsibility of the active node again? The answer is "NO" by default; when a node which was previously active node comes back to the cluster again, it will join the cluster as a standby node. It can only be primary node again if the current active node fails. This choice creates less traffic disruption.
FGT-HA-Slave # get system ha status
HA Health Status: OK
Model: FortiOS-VM64-KVM
Mode: HA A-P
Group: 251
Debug: 0
Cluster Uptime: 0 days 0:48:33
Cluster state change time: 2021-02-16 04:04:44
Primary selected using:
<2021/02/16 04:04:44> FOSVM12EEYRK_Q57 is selected as the primary because it has the least value 0 of link-failure + pingsvr-failure.
<2021/02/16 03:32:47> FOSVM1KIV5CQ2E48 is selected as the primary because it has the largest value of override priority.
ses_pickup: disable
override: disable
Configuration Status:
FOSVM12EEYRK_Q57(updated 2 seconds ago): in-sync
FOSVM1KIV5CQ2E48(updated 4 seconds ago): in-sync
Primary : FGT-HA-Slave , FOSVM12EEYRK_Q57, HA cluster index = 1
Secondary : FGT-HA-Master , FOSVM1KIV5CQ2E48, HA cluster index = 0
From the above we can see that there is no "HA Health Status" warning anymore; but FGT-HA-Slave is still the active/primary node.
We can of course alter this behavior; if we change the following in our cluster setup -
FGT-HA-Slave # config system ha
FGT-HA-Slave (ha) # set override enable
We can also do a manual failover from active node to the passive node; by running the command below in the active mode -
FGT-HA-Slave # diagnose sys ha reset-uptime
After this command FGT-HA-Master will be active node again.
FGT-HA-Slave # get system ha status
HA Health Status: OK
Model: FortiOS-VM64-KVM
Mode: HA A-P
Group: 251
Debug: 0
Cluster Uptime: 0 days 0:54:36
Cluster state change time: 2021-02-16 04:21:42
Primary selected using:
<2021/02/16 04:21:42> FOSVM1KIV5CQ2E48 is selected as the primary because it has the largest value of override priority.
<2021/02/16 04:04:44> FOSVM12EEYRK_Q57 is selected as the primary because it has the least value 0 of link-failure + pingsvr-failure.
ses_pickup: disable
override: disable
Configuration Status:
FOSVM12EEYRK_Q57(updated 5 seconds ago): in-sync
FOSVM1KIV5CQ2E48(updated 2 seconds ago): in-sync
Secondary : FGT-HA-Slave , FOSVM12EEYRK_Q57, HA cluster index = 1
Primary : FGT-HA-Master , FOSVM1KIV5CQ2E48, HA cluster index = 0
This concludes our today's blog about HA/Clustering with Fortigate firewalls.

Comments
Post a Comment