Arista EOS AAA configuration for management with TACACS+ protocol and Cisco ISE (Part I)
Today I will write about AAA configuration (SSH authentication, authorization and accounting) for Arista EOS switches with Cisco ISE as authentication server and AAA protocol will be TACACS.
Our topology is very simple. One Arista switch and One Cisco ISE server is running on the same network. Our topology looks like below -
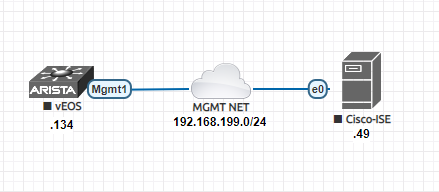
01 - Network Topology
We have a management network 192.168.199.0/24. The switch is at .134 and Cisco ISE is at .49 IP address. We are running the latest version of ISE - version 3.0.
Let's define our AAA requirements - Arista switches comes with two pre defined user roles - "network-admin" and "network-operator". We will use those two roles. Every user after successful authentication from tacacs server (ISE), will be authorized as either "network-admin" or "network-operator" role. In turn these two roles will determine read-write or read-only access to the switch.
Note: With TACACS, we can also do individual cli command authorization. In that case every command typed by a user will come to ISE/TACACS server first. ISE will send a positive/negative response to the network device upon which a user is allowed/disallowed to run that cli command. In this blog, I will not explore that feature of ISE. Instead our cli command authorization depends on locally defined "user-roles" in the switch. After successful authentication, ISE will assign the users one of the locally defined roles by using "AV-Pairs". The disadvantage of this approach is that every user roles must be defined locally in every network device. For individual cli command authorization by tacacs/ISE, have a look at the next blog.
Let's start configuring our network.
Arista Switch Configuration
Below is shown basic IP connectivity and SSH settings of the switch just for reference -
interface Management1
ip address 192.168.199.134/24
!
management ssh
idle-timeout 30
authentication mode password
!
Now we will define the tacacs server.
!!! Tacacs server IP address and secret key
tacacs-server host 192.168.199.49 key test123
!
!!! Tacacs server is assigned to a group. We will reference this group later.
aaa group server tacacs+ tac-grp-01
server 192.168.199.49
!
!!! Packets destined for tacacs server, will be sourced from MGMT interface IP address.
ip tacacs source-interface Management1
!
Now we will configure the AAA part. Our policy looks like below - console port AAA will be done locally in the switch; will not use ISE. For, SSH authentication - the switch tries the local user database first, upon failure will contact tacacs server for authentication.
!!! Create a local admin user for console authentication.
username admin role network-admin privilege 15 secret admin
!!! Console authentication is done by switch's local user database.
aaa authentication login console local
!!! SSH authentication will be tried against local database, if failed will go to tacacs server.
aaa authentication login default local group tac-grp-01
!!! Upon successful authentication; the user is logged into the enable (exec) mode directly. No need of typing the command - "enable".
aaa authorization exec default local group tac-grp-01
!!! What kind of user roles; network-admin, network-operator the switch grant to the user and where are those roles defined. More on this later.
aaa authorization commands all default local
!!! Next two commands logs all the user typed commands in different logging facilities (like - syslog, logbuffer etc.) which is called accounting.
!!! We will log console accounting data locally in the switch's logbuffer.
aaa accounting exec console start-stop logging
aaa accounting commands all console start-stop logging
!!! We will log ssh/telnet accounting data in the ISE server's tacacs accounting. We will use switch's logbuffer as a failsafe when ISE server is not available.
aaa accounting exec default start-stop group tac-grp-01 logging
aaa accounting commands all default start-stop group tac-grp-01 logging
All the commands are straight forward; except one "aaa authorization commands all default local". To understand this command, we need to explain it more. When the tacacs/ISE successfully authenticates a user, it will also send a AVPair to the switch, the switch will match this AVPair to it's internal database of user-roles and grants access according to the roles. Be careful - our roles and what access are granted by those roles are defined in the switch locally, the tacacs server just inform the switch that give the user that particular role by using AVPair.
Cisco ISE Configuration
In Cisco ISE, TACACS is called "Device Administration". By default, it is disabled. We need to enable it so that ISE shows all the options that is required to do AAA with TACACS.

02 - Enable TACACS in ISE
We will configure our users and groups. We are keeping it simple - all users and groups are defined locally in the ISE database. No external database like windows active directory is used.
We have a group named "AristaNetAdminGroup" which has a member user named "netadm01". This user will be granted "network-admin" role by the switch upon successful authentication from the ISE. We have another group named "AristaNetOperatorGroup" which has a member user named "netopt01". This user will be granted "network-operator" role by the switch upon successful authentication from the ISE.
Let's define those groups and users. For keeping it short; I will only show how to create the group "AristaNetAdminGroup" and the user "netadm01".

03 - Creating User Identity Groups

04 - Creating Network Access User
Now we will create a "Network Device Profile" and "Network Device Group" for the Arista switch.


05 - Creating Network Device Profile
06 - Creating Network Device Groups
Now we will add our switch as TACACS client and assign it the "Device Profile" and "Device Group" created in above steps.
07 - Creating Network Devices
Now comes the part of creating policy set in ISE. Arista uses PAP for tacacs communication. So, will create a Allowed protocol list which uses PAP.

08 - Allowed Protocol PAP
We will create two TACACS Profiles which will send the required/necessary AVPair to the switch upon successful authentication.
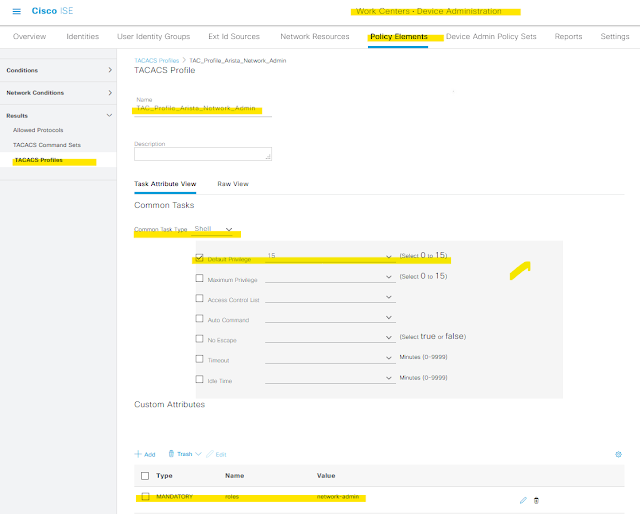
09 - Tacacs Profile Admin

10 - Tacacs Profile Operator
Now it is time to bind everything together with a "ISE Device Admin Policy Set".

11 - Device Admin Policy Set
Our "Device Admin Policy Set" works like this - with PAP protocol when a device type is Arista-Switches, try to authenticate against user group AristaNetAdminGroup we will authorize Arista-Admin access or against user group AristaNetOperatorGroup we will authorize Arista-Operator access. Otherwise deny access to the switch.
First we will look into the two user roles that are defined in the locally in the switch.
Arista-Sw-01#show users roles
The default role is network-operator
role: network-admin
10 permit command .*
role: network-operator
10 deny mode exec command configure|bash|python-shell|\|
20 permit mode exec command .*
Arista-Sw-01#test aaa group tac-grp-01 netopt01 operator
User was successfully authenticated.
Now we will actually try to do a login over SSH and verify from the switch.
Arista-Sw-01#show users detail
Session Username Roles TTY State Duration Auth
-------- --------- ----------------- ------ ------ --------- ------------------
4 netopt01 network-operator vty4 E 0:14:28 group tac-grp-01
Arista-Sw-01#show agent names | egrep -i aaa
Aaa
Arista-Sw-01#show trace Aaa | egrep -i tacacs
AaaPlugin::TacacsAaa enabled ...........
Tacacs enabled ...........
TacacsLib enabled ...........
Arista-Sw-01(config)#trace Aaa enable AaaPlugin::TacacsAaa all
Arista-Sw-01(config)#trace Aaa enable Tacacs all
Arista-Sw-01(config)#trace Aaa filename flash:tacacs.txt
Arista-Sw-01#show trace Aaa | egrep -i tacacs
Tracing sent to flash:/tacacs.txt
AaaPlugin::TacacsAaa enabled 0123456789f
Tacacs enabled 0123456789f
TacacsLib enabled ...........
Now we will look at the contents of the tacacs debug text file -
Arista-Sw-01(config)#bash tail -f /mnt/flash/tacacs.txt
2870 AaaPlugin::TacacsAaa 3 authorizeShell for method group tac-grp-01 user netopt01
2870 Tacacs 3 tac_create_author: authenMethod: 6 authenType: 1 authenService: 1
2870 Tacacs 3 tac_send_author returned 513 , status: 1 av_count: 2
2870 Tacacs 6 av pair 0 : priv-lvl=15
2870 Tacacs 6 av pair 1 : roles=network-operator
2870 AaaPlugin::TacacsAaa 3 authorizeShellCommand: status 1 m_av {'roles': 'network-operator', 'priv-lvl': '15'} o_av {}
2870 AaaPlugin::TacacsAaa 2 releaseSession keepConnection= True
Arista-Sw-01#configure
% Authorization denied for command 'configure terminal'


10 permit command .*
role: network-operator
10 deny mode exec command configure|bash|python-shell|\|
20 permit mode exec command .*
Now we can test whether everything works between the switch and Cisco ISE by the command below (tacacs group - tac-grp-01, username - netopt01, password - operator) -
Arista-Sw-01#test aaa group tac-grp-01 netopt01 operator
User was successfully authenticated.
Now we will actually try to do a login over SSH and verify from the switch.
Arista-Sw-01#show users detail
Session Username Roles TTY State Duration Auth
-------- --------- ----------------- ------ ------ --------- ------------------
4 netopt01 network-operator vty4 E 0:14:28 group tac-grp-01
We can see from the above output that a user named "netopt01" has logged into the switch and was authenticated by using "tac-grp-01" which is our tacacs server group defined in the switch.
In the background, from the switch we were also debugging tacacs protocol. The debugging was done using the commands below -
Arista-Sw-01#show agent names | egrep -i aaa
Aaa
Arista-Sw-01#show trace Aaa | egrep -i tacacs
AaaPlugin::TacacsAaa enabled ...........
Tacacs enabled ...........
TacacsLib enabled ...........
Arista-Sw-01(config)#trace Aaa enable AaaPlugin::TacacsAaa all
Arista-Sw-01(config)#trace Aaa enable Tacacs all
Arista-Sw-01(config)#trace Aaa filename flash:tacacs.txt
Arista-Sw-01#show trace Aaa | egrep -i tacacs
Tracing sent to flash:/tacacs.txt
AaaPlugin::TacacsAaa enabled 0123456789f
Tacacs enabled 0123456789f
TacacsLib enabled ...........
Now we will look at the contents of the tacacs debug text file -
Arista-Sw-01(config)#bash tail -f /mnt/flash/tacacs.txt
2870 AaaPlugin::TacacsAaa 3 authorizeShell for method group tac-grp-01 user netopt01
2870 Tacacs 3 tac_create_author: authenMethod: 6 authenType: 1 authenService: 1
2870 Tacacs 3 tac_send_author returned 513 , status: 1 av_count: 2
2870 Tacacs 6 av pair 0 : priv-lvl=15
2870 Tacacs 6 av pair 1 : roles=network-operator
2870 AaaPlugin::TacacsAaa 3 authorizeShellCommand: status 1 m_av {'roles': 'network-operator', 'priv-lvl': '15'} o_av {}
2870 AaaPlugin::TacacsAaa 2 releaseSession keepConnection= True
Form the user session (netopt01) if we try to do - "configure" it will be rejected by the switch as per network roles defined -
Arista-Sw-01#configure
% Authorization denied for command 'configure terminal'
Now we will look at TACACS logs from Cisco ISE. I will shows logs from ISE's "Reports" section as all three AAA modules are easily accessible from there. Otherwise, ISE also supports TACACS "Live Logs".
12 - Cisco ISE TACACS Authentication Report
Another interesting thing with ISE is that it supports accounting for TACACS. Accounting means that every successful executed cli commands by the user; the switch will send those commands as logs to the ISE server. We can view those accounting data from the ISE's "TACACS Command Accounting" reports. But a reminder; the switch will only send the logs for the commands a user is authorized to run. There will be no logs for the commands, the user is not authorized to run.
13 - Cisco ISE TACACS Command Accounting Report
That's it for today. In an upcoming blog I will cover ISE's "TACACS Command Sets". With command sets; we will permit/deny what cli commands are an user allowed to run in the tacacs/ise server itself, no need of defining user-roles locally in every switch.

Comments
Post a Comment