Wireguard VPN - Road Warrior/Remote Access VPN with Wireguard and VyOS
There is a new kid of VPN is in town which is Wireguard. Recently it has been accepted into the linux kernel code. So, it may be soon that different vendor start implementing in their networking products. Today I will try to explore it from the perspective of running it as an alternative of SSL/L2TP/PPTP remote access vpn, for accessing central resources from a home network through wireguard vpn tunnel. It is called another name - road warrior setup.
I will not go deep into how wireguard works. But introduce it briefly. Interested readers are welcome to google about it. Wireguard is based on UDP protocol and default port is 51820. It authentication is based on private/public key pair. Let's say we have two peers in our road warrior setup - one is wireguard client (remote user) and one is wireguard server (router/firewall running wireguard). A peer will encrypt data with is private key, then the receiving peer will decrypt the data using the sending peer's public key. So, every peer need to know the public key of the peers which are allowed to connect to it. And between two peer one needs a public IP address. Here the same restrictions apply as other vpn protocols, the connection initiating peer does not need an public IP address, but the peer who responds to incoming connections need to have a public IP address or DNS name which resolves to a public IP adress (dynamic dns names are also supported). In our example, the home user (Windows-Wireguard-Client) can sit behind a NAT device, but our router (VyOS-Wireguard-Server) must have a public IP address or necessary ports forwarded to it.
Enough talking. Let's start configuring. Our topology looks below -
 |
| 01 - Wireguard road warrior topology |
We have a client (Windows-Wireguard-Client) which will negotiate a wireguard tunnel with the VyOS router (VyOS-Wireguard-Server). Please checkout the VyOS - an outstanding open source router/firewall project. Our IP addressing looks like below -
Internet
|
192.168.199.0/24
|
VyOS IP
|
192.168.199.136
|
Windows Client IP
|
192.168.199.139
|
Local LAN behind VyOS Router
|
10.1.1.0/24
|
VyOS IP
|
10.1.1.1
|
Internal-PC IP
|
10.1.1.101
|
Wireguard Tunnel Network
|
10.1.5.0/24
|
VyOS Tunnel IP
|
10.1.5.1
|
Windows Client Tunnel IP
|
10.1.5.101
|
VyOS Configuration
I have not configured any firewall in the VyOS router. So, if your setup uses firewall, open the necessary ports accordingly.
Let's have a look at basic network setup in VyOS -
vyos@vyos# show interfaces
!!! Internet facing interface has DHCP assigned IP address
ethernet eth0 {
address dhcp
description Internet
}
!!! Interface connected with inside LAN network
ethernet eth3 {
address 10.1.1.1/24
description Lan
}
vyos@vyos# show service dhcp-server
!!! DHCP server configured for inside LAN network
shared-network-name Lan-Dhcp {
description DHCP-Server-Lan
subnet 10.1.1.0/24 {
default-router 10.1.1.1
dns-server 10.1.1.1
lease 3600
range Lan-Dhcp-Range {
start 10.1.1.101
stop 10.1.1.200
}
}
}
vyos@vyos# show service dns
!!! We are using DNS forwarding for our internal/LAN network
forwarding {
allow-from 0.0.0.0/0
cache-size 300
listen-address 10.1.1.1
system
}
In the above we have just configured the necessary interfaces, created DHCP/DNS services for our internal/LAN network. Nothing fancy here.
VyOS Wireguard Configuration
Now will configure the wireguard tunnel settings in our VyOS router.
We need to generate the private/public key-pair for the router.
The command below will generate that.
vyos@vyos:~$ generate wireguard keypair
We can view the generated keys using the commands below -
vyos@vyos:~$ show wireguard pubkey
kTX7ZkWWXy4nL5YaeE+t3X+OZW6Ule1VwmsUTdTN1UE=
vyos@vyos:~$ show wireguard privkey
OG8LIb71r7ubfG4HoyOUas/uPd5qiPlaQN1HSegTcGY=
We will share our/router public key will the Windows-Client and the Windows-Client will share it's public key with us. Let's assume that public keys are already known to each other.
To configure wireguard in VyOS, we need just some simple commands below -
vyos@vyos# show interfaces wireguard
wireguard wg0 {
!!!Tunnel IP address
address 10.1.5.1/24
description Wireguard-Vpn
!!!Tunnel MTU is set to 1400 bytes
mtu 1400
!!!Our remote peer definition
peer Win-Client {
!!! Allowed-ips - which IP adress is routed over the tunnel
!!! This is usually the IP adress allocated the remote client
allowed-ips 10.1.5.101/32
persistent-keepalive 15
!!! Peer/Windows-Client public key
pubkey Wky2g8MKxc9F04TDePOYemGaOOXJO1ygCrmYGx1dNHc=
}
!!!We will run wireguard over UDP/50000 port
port 50000
}
That' it we are done with wireguard setup in VyOS.
We have configured some extra things like - TCP MSS clamping and DNS forwarding. In our case, when a remote client connects to wireguard VPN it will use VyOS as DNS server.
vyos@vyos# show firewall options
interface wg0 {
adjust-mss 1360
}
vyos@vyos# show service dns forwarding
allow-from 0.0.0.0/0
cache-size 300
listen-address 10.1.1.1
!!!Wireguard tunnel adress will listen for DNS requests
listen-address 10.1.5.1
system
Windows-Client Wireguard configuration
We are using TunSafe in Windows 10 as our Wireguard client. All the wireguard client out there uses the same configuration syntax used in Linux. Let's have a look our configuration file in TunSafe -
 |
| 02 - Tunsafe Wireguard Client |
[Interface]
!!! Client private keyPrivateKey = 6KdiB9JOCAlWgOhhVRP1RazDCOhVV1rXqpPCqRIDMkk=
!!! Client IP address for the tunnel
Address = 10.1.5.101/32
!!! After tunnel establishment, what will be the client's DNS server
DNS = 1.1.1.1
MTU = 1400
[Peer]
!!! Wireguard Server (VyOS) public key
PublicKey = kTX7ZkWWXy4nL5YaeE+t3X+OZW6Ule1VwmsUTdTN1UE=
!!! What IP network will be routed to wireguard tunnel
!!! Some examples, 0.0.0.0/0 means everything will be tunneled to wireguard
!!! 10.1.5.0/24, 10.1.1.0/24 - We are doing split tunneling, only those two
!!! networks will be tunneled.
!!! We can control the routing side of the tunnel, from the client, but necessary !!! access like firewall etc. needed to be also opened in remote side (VyOS).
AllowedIPs = 10.1.5.0/24, 10.1.1.0/24
!!! The public IP/DNS address of the Wireguard server (VyOS) with port
Endpoint = 192.168.199.136:55000
PersistentKeepalive = 15
That's it. Now we can connect with the VyOS router using wireguard and access the LAN network (10.1.1.0/24) behind it.
Verification
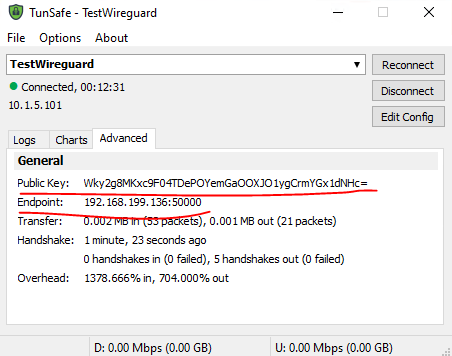
Let's try to connect from our Windows 10 client -
 |
| 03 - Tunsafe Status A |
 |
| 04 - Tunsafe Status B |
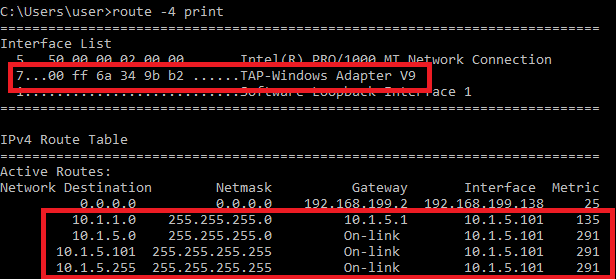
Let's check that from Windows 10 routing table -
 |
| 05 - Windows Routing Table |
C:\Users\user>ssh root@10.1.1.101
root@10.1.1.101's password:
Linux debian-eve 4.19.0-9-amd64 #1 SMP Debian 4.19.118-2 (2020-04-29) x86_64Linux debian-eve 4.19.0-9-amd64 #1 SMP Debian 4.19.118-2 (2020-04-29) x86_64
root@debian-eve:~#
We can successfully SSH into the Linux machine.
Let's try to observe the status from the VyOS side. VyOS as the time of writing has not implemented good command sets to monitor Wireguard status. Instead we need to interact with the underlying Linux in VyOS -
vyos@vyos:~$ sudo wg show wg0
interface: wg0
public key: kTX7ZkWWXy4nL5YaeE+t3X+OZW6Ule1VwmsUTdTN1UE=
private key: (hidden)
listening port: 50000
peer: Wky2g8MKxc9F04TDePOYemGaOOXJO1ygCrmYGx1dNHc=
endpoint: 192.168.199.138:61743
allowed ips: 10.1.5.101/32
latest handshake: 1 minute, 1 second ago
transfer: 18.75 KiB received, 25.39 KiB sent
persistent keepalive: every 15 seconds
From above output we can see that one endpoint (Windows Client) with IP adress (192.168.199.138) has connected with VyOS, client's IP adress and statistics about network traffic through tunnel are also shown.
Concluding Remarks
Wireguard is far better than L2TP, PPTP tunnel used for remote access VPN. We can run it in almost anything that supports recent versions of Linux. But I will point out some disadvantage comparing with the commercial SSL vpn offering from different firewall vendors. One is assigning IP adress to a remote endpoint, at this point of time there is no auto assignment of IP addresses to the remote endpoints which is a big disadvantage for large scale deployment. Then there is no mechanism for pushing routes/firewall policy to remote endpoints from the VPN server. This is also a big disadvantage.
I will end the blog with the advantages comes with wireguard. Now we have a fresh VPN implementation that runs on top of UDP and accepted into the Linux kernel. These things give me hope that missing features will be implemented soon and will be open source. The future looks bright - a simple, secure, efficient VPN that does both - site-to-site and remote-access vpn. Stay tuned I will also cover site-to-site VPN perspective of wireguard with dynamic routing in a future blog post soon.


Comments
Post a Comment