How to setup Cisco NX-OS switch-profile and config-sync
In our previous blog post - Stacking switches Part - V (Cisco Nexus vPC - Virtual Port Channel), we have looked at how to configure vPC between two nexus switches. But we were at a huge disadvantage - because of the underlying architecture how vPC/MLAG works. With any MLAG implementation, we are still managing two individual switches, they are just facilitating a LACP aggregation link which is spread throughout the vPC peers. And we are configuring the same things twice - one time in each peer of our vPC domain.
There is always risk in such setup that we miss some configuration commands in one of the switch and the vPC interfaces does not comes up. Cisco has implemented a feature called switch-profile which allows configuration syncing to all the vPC peer switches. We just configure a profile in both peer switches, make our configuration changes, then NX-OS validates the configuration and pushes it throughout the vPC domain. The good thing with config-sync is that it not only provides syncing of configuration, but also provides validation beforehand.
So, let's jump into implementing it -
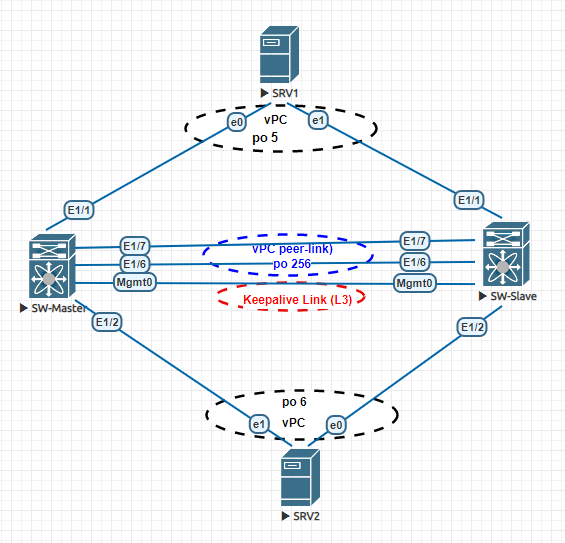
Our network topology is below -
 |
| Cisco vPC with config-sync |
- Two Cisco Nexus switches will run peering between them and will form vPC/MLAG.
- Two Debian 10 linux machine will form multichassis link-aggregation with Nexus switches. They will simulate the client connection.
- All the setups to form vPC peer relation is already done.
- We will only configure the vPC interfaces (po5 and po6) with switch-profile's config-sync.
Limitations of switch-profile and config-sync
- We must use oob management (mgmt0) as vPC keepalive link. Underlying protocol - Cisco Fabric Services over IP (CFSoIP) which allows config-sync does not allow layer-3 or SVI interface as keepalive link.
- We cannot have same configuration under configuration mode and switch-profile, in that case validation will fail. Any configuration changes is allowed only once either in global configuration mode (config terminal) or in switch-profile mode.
Configuration
We have already working vPC peering. I will no show how to do that. For who are interested I am referring to the previous blog post.
For activating switch-profile with config-sync we need to do three simple things - enable CFSoIP over mgmt0 interface which is our keepalive link, create a switch-profile (profile name must be the same in both peer switches) and define our peer IP adress with which we will synchronize our configuration.
In SW-Master -
cfs ipv4 distribute
configure sync
switch-profile vpc-profile
sync-peer destination 10.1.1.2
In SW-Slave -
cfs ipv4 distribute
configure sync
switch-profile vpc-profile
sync-peer destination 10.1.1.1
At this point CFSoIP should be enabled and our switch-profile should be synced.
Master# show cfs status
Distribution : Enabled
Distribution over IP : Enabled - mode IPv4
IPv4 multicast address : 239.255.70.83
IPv6 multicast address : ff15::efff:4653
Distribution over Ethernet : Enabled
Master# show switch-profile status
switch-profile : vpc-profile
----------------------------------------------------------
Start-time: 600674 usecs after Fri Jun 5 08:41:38 2020
End-time: -
Profile-Revision: 1
Session-type: -
Session-subtype: -
Peer-triggered: No
Profile-status: -
Local information:
----------------
Status: -
Error(s):
Peer information:
----------------
IP-address: 10.1.1.2
Sync-status: In sync
Status: -
Error(s):
Now we will create vlan 101 and two vPC interface named po5 and po6 configure them as access port for vlan 101. All this configuration is done in "configure sync" mode under the switch-profile named "vpc-profile".
In SW-Master -
configure sync
switch-profile vpc-profile
vlan 101
name Server-Vlan
int ethernet 1/1
channel-group 5 mode active
int ethernet 1/2
channel-group 6 mode active
int port-channel5
switchport access vlan 101
vpc 5
int port-channel6
switchport access vlan 101
vpc 6
Now our configuration in place which we will commit and send across our vPC fabric. But let's review some advantages of "switch-profile" first.
When we configure something under a switch-profile, the configuration is not active, it is placed in a buffer. Let's have a look at this buffer -
Master# show switch-profile buffer
switch-profile : vpc-profile
----------------------------------------------------------
Seq-no Command
----------------------------------------------------------
2 vlan 101
2.1 name Server-Vlan
3 interface Ethernet1/1
3.1 channel-group 5 mode active
4 interface Ethernet1/2
4.1 channel-group 6 mode active
5 interface port-channel5
5.1 switchport access vlan 101
5.2 vpc 5
6 interface port-channel6
6.1 switchport access vlan 101
6.2 vpc 6
Above "Seq-No" is a important thing, if we want to delete some configuration from the buffer we will refer them with "Seq-NO".
Master(config)# configure sync
Master(config-sync)# switch-profile vpc-profile
!!! With buffer-delete we can remove configuration from our profile's buffer
Master(config-sync-sp)# buffer-delete ?
<1-9999> Range(whole-number) of command id(s) to be deleted from
switch-profile buffer
WORD Exact command id (x.x.x format) to be deleted from switch-profile
buffer (Max Size 64)
all Delete all buffered commands
It is recommended to do a consistency check before activating the configuration from the buffer which can be done easily by -
Master(config-sync-sp)# verify
Verification Successful
In our case as the verification is successful, now we will actually activate the configuration and which in turn will be synced to the SW-Slave from SW-Master.
Master(config-sync-sp)# commit
Verification successful...
Proceeding to apply configuration. This might take a while depending on amount of configuration in buffer.
Please avoid other configuration changes during this time.
Commit Successful
Now our configuration change should be present on all the peer switches in the vPC domain.
Let's have a look at your switch-profile status again -
Master# show switch-profile status
switch-profile : vpc-profile
----------------------------------------------------------
Start-time: 524476 usecs after Fri Jun 5 09:16:10 2020
End-time: 595991 usecs after Fri Jun 5 09:16:40 2020
Profile-Revision: 2
Session-type: Commit
Session-subtype: -
Peer-triggered: No
Profile-status: Sync Success
Local information:
----------------
Status: Commit Success
Error(s):
Peer information:
----------------
IP-address: 10.1.1.2
Sync-status: In sync
Status: Commit Success
Error(s):
We can see that our revision number has been increase from 1 to 2 and both local and peer switch is in sync and a commit operation has be performed successfully.
If we want the detail information about all the previous profile-revision, then we can run the command below -
Master# show switch-profile session-history
Now we can check from SW-Slave that our configuration changes exists in SW-Slave -
Slave# show running-config | begin port-channel5
interface port-channel5
switchport access vlan 101
vpc 5
interface port-channel6
switchport access vlan 101
vpc 6
And definitely our vPC interfaces should be up and running -
Slave# show vpc 5
vPC status
----------------------------------------------------------------------------
Id Port Status Consistency Reason Active vlans
-- ------------ ------ ----------- ------ ---------------
5 Po5 up success success 101
Slave# show vpc 6
vPC status
----------------------------------------------------------------------------
Id Port Status Consistency Reason Active vlans
-- ------------ ------ ----------- ------ ---------------
6 Po6 up success success 101
When we are using switch-profile, if we look at the running-config and startup-config, there is nothing there that shows which part of the configuration is coming from "switch-profile". We can verify that only using command below -
Master# show running-config switch-profile
switch-profile vpc-profile
sync-peers destination 10.1.1.2
vlan 101
vlan 101
name Server-Vlan
interface port-channel5
switchport access vlan 101
vpc 5
interface port-channel6
switchport access vlan 101
vpc 6
interface Ethernet1/1
switchport access vlan 101
channel-group 5 mode active
interface Ethernet1/2
switchport access vlan 101
channel-group 6 mode active
The same thing applies for startup-config -
Master# show startup-config switch-profile
Now what happen when we try to delete a switch-profile, as we have explained configuration changes under a switch-profile resides in a special section in underlying NX-OS.
Master(config)# configure sync
Master(config-sync)# no switch-profile vpc-profile ?
all-config Deletion of profile, local and peer configurations
local-config Deletion of profile and local configuration
profile-only Deletion of profile only and no other configuration
Master(config-sync)# no switch-profile vpc-profile profile-only ?
all Deletion of profile only and no other configurations from all the
peers
local Deletion of profile only and no other configurations in local switch
We can see above that there are different options available when deleting a profile - we can delete profile and loose the configuration in both switches or local/peer switch only, or just delete the profile. So, one can select a option which suits one's needs. But important thing to remember is that configuration changes done by a profile is placed separately than running-config or startup-config.
We have also the opportunity of importing an existing configuration from configuration mode and import it to switch-profile mode.
Master(config-sync-sp)# import ?
<CR>
interface Interface configuration
running-config Running-config
Sometimes the import function does not work. In that case we just temporarily disable synchronization, import the configuration and re-enable synchronization.
!!! Disable synchronization in both switches
Master(config-sync-sp)# no sync-peers destination 10.1.1.2
Slave(config-sync-sp)# no sync-peers destination 10.1.1.1
!!! Import the require configuration
Master(config-sync-sp)# import int eth1/8
Master(config-sync-sp-import)# verify
Master(config-sync-sp-import)# commit
Slave(config-sync-sp)# import int eth1/8
Slave(config-sync-sp-import)# verify
Slave(config-sync-sp-import)# commit
!!! Enable synchronization again
Master(config-sync-sp)# sync-peers destination 10.1.1.2
Slave(config-sync-sp)# sync-peers destination 10.1.1.1
Reference
- Cisco Nexus 9000 Series - Configuring Switch Profiles
- vPC Domain Configuration Synchronization Guidelines


Comments
Post a Comment